Hot Butter Lollipop Chicken

This recipe is extremely easy and has just a few ingredients!  Your guests would never expect such a big awesome flavor comes from a 4 ingredient recipe.

It’s absolutely delicious and easy to eat!  Removing that extra skin and tendon gives us a clean handle to hold on to while we mow down and our hands stay gorgeous and grease free!  The only napkins you’ll need are for your drool when you smell these babies cooking!

Next stop:  Flavor Country!

Hot Butter Lollipop Chicken:

Ingredients:

  • Chicken Drums
  • 2 Sticks of Butter
  • 1 Cup of Louisiana Hot Sauce
  • 1/4 Cup of Soy Sauce

Directions:

The hardest part of this recipe is to lollipop the chicken.  Once you figure out the first one, the rest are easy!  About 2-3 inches down the leg bone, take a sharp knife and cut around it.  You’ll start to see the meat, skin, and tendons separate.  Keep going in a circle until you can see that the skin, meat, and tendons have all separated from the part that you’re keeping.  Take your thumb and push up from the cut to the top of the bone.  Once you reach the top of the bone, take your thumb and push the skin up and over!  It’ll look like this.

IMAG2776_1_1

Take your butter, hot sauce, soy sauce and put them in a microwave safe bowl.  Nuke it until the butter is melted.  Yes – of course you could melt it on the stove top, but we’re all about making this easy!  Boom – this is your sauce and marinade.

Put your chicken in a Ziploc bag, pour in half of your sauce, seal, and place in the fridge for 4 hours or so.  We’re keeping the other half to use as a baste when our chicken is cooking.

Setup your grill for classic indirect heat.  We only want heat on one side of our grill.  We’re going to place our chicken on the opposite end and close the lid.  That indirect heat will slowly cook our chicken to juicy heaven!

IMAG2706

Once your coals are mostly grey and you’re holding a temp of around 350, place your chicken on the grill.  The marinade will have clumped by now because of the cold temperature in the fridge solidifying the fat in the butter.

Close your grill lid and let the chicken cook.  Take your leftover sauce that hasn’t touched the chicken and baste your chicken every 10 minutes or so.  We really want this flavor to cook in!  After about 50 minutes or so, your chicken should be done.  It’s pretty hard to screw this one up!  To be certain, an instant read thermometer is good to have on hand.  Make sure your chicken has hit 165 degrees and you’re golden!

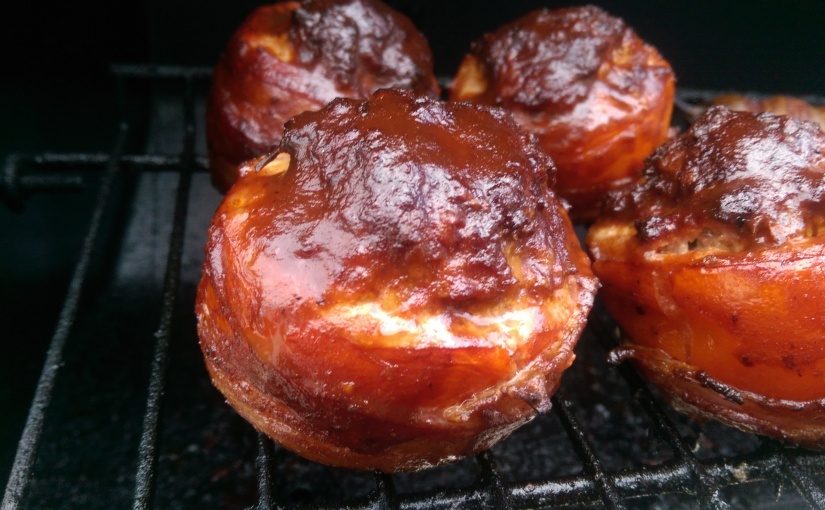
Wow!  Look at this!  Buttery, spicy, salty, goodness!  It’s so juicy, packed with flavor, and easy to do!  Check this one out!

IMAG2781_1_1

Loaded Baked Potato Salad

If you’re looking for a classic side dish with a new attitude – this is the one for you!  Potato Salad is a classic side for any BBQ, but this takes it up a notch and is well worth making.  We take all of those delicious flavors you get in a steakhouse baked potato and combine them into a flavor exploding potato salad!  I never end up having leftovers with this, no matter how much I make.  Ever…  It has bacon and bacon wins…always.  ON TO THE POTATO SALAD!

Loaded Baked Potato Salad

Ingredients:

  • 5 Yellow Potatoes
  • 1/2 lb Bacon
  • 1 Cup Shredded Cheddar Cheese
  • 2 Cups Sour Cream
  • 1 Cup Mayonnaise
  • 1 1/2 Cup Chopped Celery
  • Diced half of a Large Red Onion
  • 1 tspn Apple Cider Vinegar
  • 1 tspn Sugar
  • 1 tsnp Salt
  • 1 tspn Pepper
  • 1 tspn Garlic Powder

Directions:

Cut your potatoes into bite size pieces.  I like to use yellow/gold potatoes in this recipe because they have a nice soft and creamy texture.  That is what we’re looking for here!

IMAG2793_1

Bring a pot of water to a boil and toss in your potatoes.  Let them cook until they are just fork tender, strain them, and let them cool down to room temperature.

IMAG2812_BURST018_1

BACON!  Get that bacon sizzling and fill your home with that smoky and artery clogging aroma!

IMAG2810_BURST004_1

A moment of silence…  Now cut it to bits like you’ve lost all sense!

IMAG2813_1

Now lets combine all of these ingredients and devour it!

IMAG2815_1IMAG2817_1IMAG2818_1IMAG2819_1

I like to refrigerate it for a few hours to let the flavors combine, but it is absolutely acceptable to smear it into your face right away!

Well, here you have it:  The best potato salad around.  You’ll never buy that slop from the store again once you give this tasty morsel a try!  Creamy, cheesy, crunchy, and the perfect addition to a burger or anything!

IMAG2822_BURST002_1


Fresh Herb Vinaigrette Pork Filet Mignon

After building my raised garden this year, I’ve been (impatiently) waiting to start using my fresh veggies and herbs!  There is just nothing like garden fresh!  N-O-T-H-I-N-G!  I had the opportunity to try something new while incorporating some of my garden children (Plants, people…  No cannibalism here.  Not until the zombie apocalypse).  Speaking of – what is your favorite zombie movie?  I’m still partial to the 1978 version of…wait…we’re getting off track.  Back to the pork…

If you’re looking for a way to keep your pork tender, flavorful, and juicy…this is the one.  After pulling this off, nobody will be asking “Where’s the beef?”.  This marinade is so packed with amazing flavor, your pork will soak it up and become a bacon wrapped dream come true.  You’ll wonder why you ever ate Aunt Mildred’s dried out pork chops.  We never did like her much, did we?  ON WITH THE FOOD!

Fresh Herb Vinaigrette Pork Filet Mignon

Ingredients:

8 Pork Filet Mignons

3 tblspn Dijon Mustard

1/2 Cup Olive Oil

1/2 Cup Water

The Juice of 1 Lemon

1 tblspn Chopped Rosemary

1 tblspn Chopped Licorice Basil (you can also use regular Basil)

1 tblspn Chopped Garlic

1 tspn Fresh Cracked Black Pepper

1 tspn Salt

1 tspn Red Pepper (optional)

Fresh Rosemary and Licorice Basil from my garden:

IMAG2759_1  IMAG2760_1

Directions:

Grab a mixing bowl and add your olive oil, Dijon mustard, lemon juice, rosemary, basil, garlic, salt, and red pepper.  The red pepper is to give a little heat on the back end.  It isn’t necessary…if your soul is weak.  If you do not have licorice basil, regular basil will do just fine.  Licorice basil has more of an anise flavor present.  It compliments the vinaigrette the way you do your wife when she walks out in that favorite dress of hers…that she only wears once…and then needs to buy a new one.

IMAG2770_1

Whisk thoroughly until the vinaigrette comes together and emulsifies.  You will now add in your water and whisk again to combine.  It is not common in a vinaigrette to add water, though some chefs do add small amounts at times to thin it out and help level the strong flavors.  In this case, we are doing it to thin out our vinaigrette and help it easily cover our pork.

IMAG2773_1_1

Put your pork cuts into a Ziploc bag, pour in your marinade, remove as much air as possible and seal your bag.  Place in the fridge and marinade for at least 4 hours.

IMAG2774_1

Setup your grill for direct heat.  Make sure to leave a spot open that we can move the pork filets to that will not be directly over your heat source.  As always, I’m using charcoal.

IMAG2706

Once your coals are ready, put those beautiful chops directly over your heat!  We want a medium to medium high heat.  Place the back of your hand over your heat – If it takes 3 – 5 seconds until it becomes too hot and you have to remove your hand, then our heat level is on point!

IMAG2785_1_1

Cook about 4 to 5 minutes a side making sure to get some nice grill marks.  After cooking on each side, move your chops away from the heat source, close your grill, and finish cooking.  Our grill is now acting as our oven to finish the cooking process.  This ensures we do not dry the outside out before the inside is done cooking.

Let them cook another 6 minutes or so.  Grab your meat thermometer and make sure you have reached a temperature of 140 degrees.  Remove your chops and let them rest for about 5 minutes.  The cooking process will continue and they’ll reach around 145 degrees.  This will give you a nice medium pork filet.  Stop drying out your pork!  However, if you like it done a bit more; go a few more degrees…it’ll still be juicy!

IMAG2783_2

This filet gets the smoky flavor from the bacon, the tang from the Dijon, the light citrus from the lemon, and the freshness from those amazing herbs and garlic!

Well – there it is!  You are now the Pete Sampras of Pork!  Hungry?

Italian Dressing Grilled Chicken Breast

Are you looking for an easy way to achieve juicy plump breasts but don’t have a plastic surgeon?  This is the next best thing!  Hey – you’re already beautiful…so eat some food and be happy!  This takes such little effort and is almost impossible to botch!  Try it out and change the way you think about grilled chicken!  How often have you eaten a tough, dry, and flat flavored chicken breast?  The horror.  The pain!  Try this out and you’ll instantly have your staple for chicken breast recipes!

Italian Dressing Grilled Chicken Breast

Ingredients:

  • 4 Boneless Skinless Chicken Breasts
  • 2 Cups of Italian Dressing

Directions:

Clean your chicken removing any excess fat.  We want these cuts lean and pretty!

IMAG2557

Place your meat into a Ziploc bag and pour in the Italian Dressing.  Place into the fridge and marinade for the next 4 hours.  You don’t want to marinade beyond this as the vinegar in the dressing can cook and change the texture of your chicken.

IMAG2672

Setup your grill so you have a hot zone for direct heat and another open area away from the coals so you can cook indirectly.  If you have a gas grill, turn on only half of your burners.

IMAG2706

Once your grill is heated and ready (coals are 3/4 grey), place your chicken breast directly over the heat.  We want about a medium to medium high heat.  The way we know the level of heat is by placing the back of your hand over your coals or burners.  If it takes 3-5 seconds before its so hot you have to move your hand, that’s what we’re looking for.

Cook about 5 minutes on each side and then move away from the coals, so we can shut the grill lid and cook them indirectly for about another 6-10 minutes depending on how hot your grill is.  You can baste them every few minutes with more Italian Dressing to enhance the flavor!

Remove your breasts from the grill.   You can finish with a little salt and pepper.  Serve and win the hearts of many!

IMAG2721

Cheesy Stuffed Portobello Mushroom

Portobello mushrooms aren’t the most inexpensive mushroom, but when you are looking to kick it up a notch and really shine your guests on; this is the perfect way to do it!  Fire up these fungi and instantly become irresistibly attractive.

Cheesy Stuffed Portobello Mushrooms:

Ingredients:

  • 6 Portobello Mushrooms
  • 1lb Ground Country Pork Breakfast Sausage
  • 1 8oz Block of Cream Cheese
  • 1 Cup Monterey Jack Cheese
  • 1 tblspn Ancho Chili Powder
  • 1 tspn Garlic Powder
  • 1 Cup of Diced Celery
  • Bread Crumbs
  • Melted Butter

Directions:

Brown your sausage in a pan.  Pour the sausage into a bowl and mix in the cream cheese, monterey jack cheese, celery, ancho chili powder, and garlic powder.

Use your super human strength and remove the stalks from your mushrooms.  You’re so strong!

IMAG2635_1

Generously pack your mushrooms with your filling then top with bread crumbs and drizzle with your melted butter.  The butter will help the bread crumbs brown while cooking.  Nobody likes a pale bread crumb.  We want them to look Brazilian.

IMAG2638_1

Setup your grill for indirect cooking.  Start your coals on one side of the grill leaving the other side open.  If you’re using propane, turn on only half of your burners.  Let your charcoal start and become mostly grey.

Place your mushrooms on the side of the grill opposite your heat.  Close the lid and try to maintain an internal temp of 350-375 degrees.

IMAG2640

After about 20 minutes check on your mushrooms.  The bread crumb topping should be golden brown and your mushrooms should feel tender like your wife’s…heart.

IMAG2650

Pull them off the grill and serve while still warm!  If you’re really looking to impress – serve with a Bone-In Ribeye Filet!

shroom IMAG2658

Hungry yet?!

Grilled and Creamy Stuffed Bell Pepper

Looking for an easy, cost effective, and delicious way to appease your pepper loving guests?  This one will do it!  The creamy queso rice, salty and spicy chorizo, and the fresh bell pepper are the perfect vehicle on the grill to soak up that popping smoky flavor!  I love grabbing these peppers fresh from the garden.  You can beat your kids but you can NEVER beat your own organically grown vegetables.  I’m joking!  Organic meat is better…

Grilled and Creamy Stuffed Bell Pepper

Ingredients:

  • 5 Bell Peppers
  • 4 Cups Monterey Jack Cheese
  • 1lb Chorizo
  • 2 Packs of Knorr’s Rice Sides – White Cheddar Queso
  • 1 tblspn Ancho Chili Powder

Directions:

Brown your Chorizo and drain the fat.  Cook your rice following the instructions.  If you cannot find this specific brand, use your favorite cheesy rice pack.  They only take about 7 minutes and work well with this recipe.  Add in 2 cups of Monterey Jack Cheese, your Ancho Chili Powder, and Chorizo.  Mix thoroughly.

rice

Cut the tops off of your Green Peppers and make sure all of the seeds and ribs are removed.  Generously stuff each pepper with your rice and chorizo stuffing.  This ain’t no sissy pepper.

IMAG2568_1

Setup your grill for indirect heat.  Let your grill heat up to about 350 and then place your peppers on the opposite end of the grill, away from the coals.  If you are using gas, only turn the burners on one side/half of your grill, placing the peppers on the opposite end.  Close your grill lid and let it work it’s magic!

IMAG2577_1

After about an hour: **MAGIC**  **POOF** A PURPLE UNICORN?  No!  Your peppers – and they will look like this!  I used a smoke pack (which you can read the “how to” in my tips section) for that added smoky flavor, but it’s not necessary…if you’re a wimp!

IMAG2580_1

Add your remaining cheese to the tops of the bad boys, close the grill, and let that beautiful cheese melt!  (I just had the “Roll that beautiful bean footage” line go through my head)

IMAG2582

Hey – you’re a pro now!  Remove from the grill, serve, and Uncle Charles will never make fun of your cooking again!

IMAG2583_1_1

Dr. Pepper Chicken

Looking for a super simple recipe that will make your chicken juicy, super tender, and full of flavor?  Look no further!  This one will keep your guests guessing what that amazing flavor is and how you were able to keep your chicken SO JUICY!

Dr. Pepper Chicken

Ingredients:

3 – 4lbs Boneless Skinless Chicken Breasts

1 can of Dr. Pepper

1/4 Cup Soy Sauce

2 tspn Garlic Powder

Directions:

Combine the Dr. Pepper, soy sauce, and garlic powder in a bowl and mix.  Set your marinade aside.

Clean your chicken breasts by cutting off any excess fat.

IMAG2557

Place your breasts (the chicken) into a Ziploc bag and pour in your marinade.  Put the bag in the fridge and let it marinade for 4-5 hours.

IMAG2559

Heat up your grill and put these bad mamma jammas on!  I put them directly over the medium-high heat to get some marks and then finished cooking them by putting the breasts to the side and closing the grill.

IMAG2584_1_1

After about 20 minutes (though this will vary grill to grill, so use a meat thermometer), the chicken is done and absolutely DELISH!  Make your pappy proud and grill this up for father’s day!

Dr. Pepper Chicken
Dr. Pepper Chicken

Crispy Buttery Grilled Potatoes

If you’re looking for a fast and simple side to add that additional “wow factor” to a steak or some BBQ chicken, this is the PERFECT go-to!  With just a few ingredients, simple preparation, and BIG FLAVOR – you cannot go wrong here!

Crispy Buttery Grilled Potatoes

Ingredients:

  • 5 Yellow/Gold Potatoes
  • 1/2 Cup Italian Dressing
  • 1/2 Cup Melted Butter
  • 1/4 Cup Louisiana Hot Sauce

Directions:

The sauce here goes perfect with our potatoes.  We get the nice garlic flavor with sweet notes from our Italian Dressing, the creamyness of the butter, and the vinegary zing from our hot sauce.  When this sauce is cooked onto our potatoes, it is a match made in heaven!

To make your simple sauce, thoroughly mix the Italian Dressing, melted butter, and Louisiana Hot Sauce.  Set aside.

We use yellow/gold potatoes because the skin is light and pleasing to eat and the potato itself is very creamy which is a perfect vessel for these flavors!

Par boil your potatoes on the stove.  We do this because cooking a raw potato on the grill can take quite a bit of time and this just ensures a perfectly cooked potato with all of the right balance of flavors.  This will take about 20 minutes.  Take a knife and it should slide easily in and out of your potato.  Once done – slice your potatoes in half after allowing them to cool a bit.

Start your coals and let the grill get hot.  Take your sauce and brush it heavily over the cut side of the potatoes.  Place your cut side of the potatoes over the hot grill first.  While cooking, heavily baste the exposed side of the potatoes.

IMAG2512

Let them cook for about 5 minutes or so.  We want these potatoes to get a good brown color on them.  Once you’ve achieved that beautiful brown char, flip your potatoes over and cook the other side.  Baste them again.  We really want this sauce to cook into the potatoes as much as possible!

IMAG2513_1

Once done – pull these bad mamma jammas off and baste once more!

Serve and bask in the pool of hugs and kisses you’ll get from your guests!

IMAG2514_1_1

Grilled Mini Meatloaf Stuffed Tomato

This is a perfect recipe if you’ve got garden tomatoes and ground beef you need to use and would like to turn it into something creative and epic for your guests!

Grilled Mini Meatloaf Stuffed Tomato

Ingredients:

  • 1lb Ground Chuck
  • 1/2 Cup Shredded Mozzarella
  • About 6 Tomatoes
  • 1 Egg
  • 1/2 Cup Bread Crumbs
  • 1/4 Cup Diced Onion
  • 1/4 Cup Diced Celery
  • 1-2 tspn Salt
  • 1 tspn Pepper
  • 1 tspn Garlic Powder
  • 6 Strips of Bacon
  • 1/3 Cup A1 Sauce
  • 1 tblspn BBQ Sauce

Directions:

Combine your A1 and BBQ Sauce to create a sauce.

Combine beef, cheese, egg, bread crumbs, onion, celery, salt, pepper, and garlic.

IMAG2429

Take the tops off of your tomatoes and hollow them out with a knife and spoon.

IMAG2430

Stuff each tomato with your delicious magical meat mixture.

IMAG2431

Wrap each tomato with 1 slice of bacon.  You are now popular.

IMAG2432

Setup your grill for classic indirect heat.  If using charcoal, setup your coals on one side of the grill, leaving the opposite end clear.  If using propane, only light the burners on one side or one half of your grill, depending on the size.  Throw your wood chip box or foil smoke on the grates directly over the coals.  If you’re not familiar with using wood chips on your grill, click HERE to find out how.  It’s very easy!

IMAG2365

Let your grill heat up to and maintain a 350 degree temperature.  Place your tomatoes opposite the heat, ensuring they are not directly over any coals or flames.  Look at that! – Now keep your grill lid closed!

IMAG2439

After about 30 minutes, open your grill and check your tomatoes.  If the bacon is brown and the meatloaf is firming up, you’re ready to move forward.

IMAG2440

Take your sauce mixture and coat your tomatoes thoroughly.  Close your grill and cook for another 3-5 minutes.

IMAG2445

Remove from the grill and enjoy!

IMAG2448

Grilled Corn with a Lime Zest and Cumin Compound Butter

In the infamous words of Homer:  “you don’t win friends with salad”, but here is a veggie that’s certain to make you the Caroline Manzo of your neighborhood!  (“Did he just make a ‘Housewives of New Jersey’ reference?”).  Hey – I can guarantee this:  Teresa Giudice doesn’t make corn this tasty!

Grilled Corn with a Lime Zest and Cumin Butter

Ingredients:

  • Corn
  • 1 stick of softened salted butter
  • 1 Lime
  • 1 tspn Cumin Powder

Directions:

Making the compound butter:

Place your stick of butter and cumin into a small mixing bowl.  Take your lime and grate the zest into your butter bowl.  Cut the lime in half and squeeze one half of the lime’s juice in.  Mix Thoroughly.

IMAG2434

Cooking your corn:

Setup your grill for direct heat.  We’re wanting to put this corn directly over our heat and get some good color!

I setup a foil smoke pack and put my corn on the top rack directly above the smoke.  You can put your corn directly over the heat and it will be just as good.

Take some of your butter and put it on your corn as it cooks on the grill.  Let it baste right in!

After about 10 minutes – or until your corn is nice and tender – take it off the grill and smother it with your unicorn butter!  After all, it is quite a magical concoction!

You get that smoky flavor from the cumin; that wonderful citrus from your lime; the creamy saltiness from your butter; and that wonderful natural sweetness that comes from the corn when grilled!

Give this a try and make that kid Billy that used to take your lunch money beg to come eat at your place!

Enjoy!

IMAG2444_1_1